Tutorial
1 Basics
1.1 Quick start
IMPORTANT : "SMS to Desktop note" is an Android widget, not an app !
SO, IT'S REALLY IMPORTANT TO NOTE that, once "SMS to Desktop note" is installed on your phone or your tablet, you will not see an icon in the apps screen. You have to install one of the app widgets on the screen first.
To do that, on several android versions, just press and hold on any empty space on your home screen (you'll need to hold for 2-3 seconds). You'll then notice the "Widgets" icon option appear on the screen. First, click on this widget option and then click on one of "SMS to Desktop note" widgets to put it on your smartphone desktop. We suggest you choose the "2 x 1" widget.

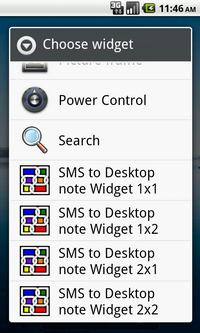
That's it, you're done !
Alternately, on some Android 4.x devices and versions above, you will have to press the center launch icon in the dock (see red circle in the image below) to access first the widgets window where you will find then one of "SMS to Desktop note" widgets. We suggest you choose the "2 x 1" widget.

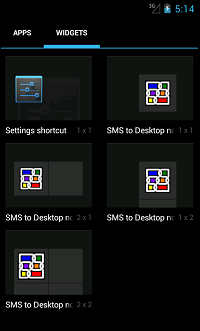
That's it, you're done !

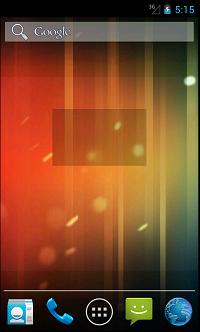
Once a widget is in place on the desktop, you see that you have now a grey area, an "empty" space for creating, now or later, a note to you can use at will, even erase it in a one tap operation if you wish (no need to put your widget in the trash bin), move, or resize it quickly (if your phone is on Android 4.x or a version above, for this specific operation).
Please note that the default note transparency can be defined in the app's settings, especially to cope with a desktop background image if you have one (like in the screen above).
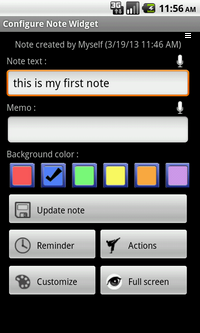
Press now the grey area. In a dialog window that will appear automatically, you will be able to start providing text or send it through voice input in this following screen. We suggest that you type first the text, as voice input may be not available on your phone. Press the "Ok" button to validate your input : you will see the main screen now, completed with your text.

Please note that "SMS to Desktop note" uses Google voice recognition system. This system needs your phone to have an internet connection available to work, because it offloads its processing to the Internet cloud. Everything you say to Android goes back to Google's data centers, where powerful servers apply statistical modeling to determine what you're saying. We suggest that you test and/or configure first the tool before using it.
Push now the "update" button and you will obtain a desktop note as below.
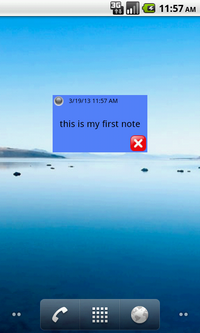
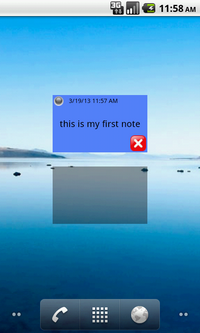
Select another widget and put it on the desktop. You have now a new empty note space that can be used.
Type a SMS on your phone to send it to yourself (i.e. to your own phone number) as a test. Add this character sequence somewhere in the message before sending it : @dn@
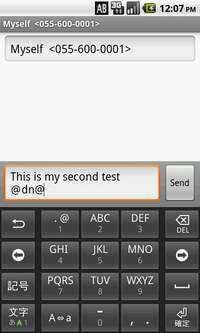
You will receive shortly your common SMS noise signal, and your test will appear as a blinking note that fills the second widget.
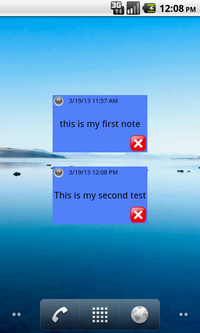
Now, you know that if you give the @dn@ code to one of your contact, he will be able now to leave you, if needed, desktop notes instead of simple SMS.
1.2 Overview of the common actions on the desktop notes
Once you click on a note filled with text, several options are available using the main screen below, which is the center point of the app.
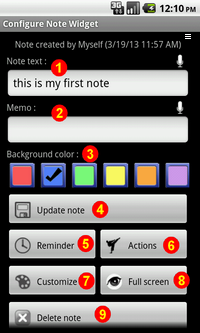
In this section, you will be given a general insight of the commons actions which can be done from the screen. We will use each red number put on the screen above as a reference.
1.2.1 Text input
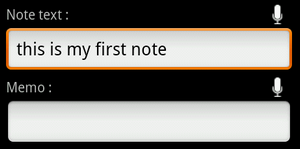
You have already understood that using the Text field (1), you will be able to fill the note's main text content. The text input is done using an input dialog box which appears when you tape in the field.
Using the Memo field (2), you will be able to give your own personal comment or memo to the note. The text input is done using an input dialog box which appears when you tape in the field. Please note that the Memo information will not be used elsewhere than for display here in the main screen or in the fullscreen display (it will stay on your device only). For example, nobody will see it if you decided to share the note to other people using functions of the "Actions" button (6)
Alternatively, you can provide the two fields content through voice input, if this option is available on your phone. In order to do this, you can push the recorder button at the right of the chosen field. Once, recorded and analysed by Google, the text will appear automatically in the field.
The recorder button can also be present on your virtual keyboard, so a third option would be to select the field, and in the input dialog screen that will appear, select the mic button of your virtual keyboard to provide the text using the voice.
Please note that "SMS to Desktop note" uses Google voice recognition system. This system needs your phone to have an internet connection available to work, because it offloads its processing to the Internet cloud. Everything you say to Android goes back to Google's data centers, where powerful servers apply statistical modeling to determine what you're saying. We suggest that you test and/or configure first the tool before using it.
Pushing the "Update note" button (4) is crucial to validate your inputs in these fields : it's only when you will push it that the change made to the two input fields will be saved. Exiting the main screen using the "Back" button of your phone will be considered as canceling the operation.

1.2.2 General note display
Several background colors for notes are available. You can choose one using the color radio buttons at the center of the screen (3).

Pushing the "Update note" button (4) is crucial to validate your choice of color : it's only when you will push it that the color change will be applied to the note. Exiting the main screen using the "Back" button of your phone will be considered as canceling the operation.

The "Customize" button (7) will give you the control on the font size and the font color for the current note.

We will see later that the default behaviour of the previous options can be defined in the app's settings.
1.2.2 Creation of a reminder
A reminder can be associated with each note, using the "Reminder" button (5).

You can declare an date, hour and define the frequency of the alarm, if it's not a one-time event by default.
When a reminder fires, you will see the note blinking by default for a few seconds, and the phone will vibrate, ring and display a notification.
We will see later that this default behaviour can be defined in the app's settings.
1.2.3 In fullscreen
Sometimes, a note will contain more text elements than it can display on the desktop. If the note display on the desktop shows the text truncated, you can see the full content using the "Fullscreen" button (8).

Then, a screen will appear with the text occupying it entirely, with the possibility for you to press links automatically made with recognizable parts of the text message : phone number, web urls, etc... The memo of the note, if present, can be displayed too, alternately.
1.2.4 Use the note
Using the "Actions" button (6), you will be able to made further uses of the note.

Various functions are available : you can send the note to other people by SMS (and make it a desktop note on their phone if they have the "SMS to Desktop note" app on their phone too), share it on Tweeter, or send it by mail, or export the text content to your Dropbox, but you can also reply to its sender, both manually or with a predefined message too. At last, it's also possible to make of the note an event that will appear in your phone calendar (the reminder included, if one has been defined).
1.2.5 Delete the note
Using the "Delete" button (9), you can dispose of the note.

A dialog box for confirmation will appear. The space in the widget will come empty again. No need to put the empty widget to the trash bin as it can be used again for a future note, or to receive a note from one of your contacts.
We will see later that if you disposed of a note by mistake, the note can be recovered. An option for the deleting confirmation is also available in the app's settings.
We will also see later that the default note transparency can be defined in the app's settings.
Others functions will be describe in the paragraphs to come.
1.3 The app in details
1.3.1 Note creation & handling
When you choose a "SMS to Desktop note" widget in the widget window, you determine directly the default size the widget will have when put on the desktop.
4 sizes are available for now, and the numbers reflect the Width x Height : 1 x 1, 1 x 2, 2 x 1, 2 x 2.
We suggest you choose a size that can be adapted to your text size, so the "2 x 1" widget is often a good start option.
A note can contain all the text content you want, but the size of its widget will have an influence on what can be displayed on the desktop.
If you have an Android version previous to Android 4.x, the size of the widget you chose can't be adjusted later so it's important to choose a size suited to your use (by the way, we will see later that you have also an alternative : copy the widget content in one another), or, by default, choose the maximum size (2 x 2) if you don't know in advance what the length of the note text will be. The "Fullscreen" button will help you in any case to see all the note content, even in a one press touch as we will see.
On Android 4 and later versions, you can adapt the size of the widget by pressing on it a few seconds (without moving) : anchors will appears to allow you to resize the widget.


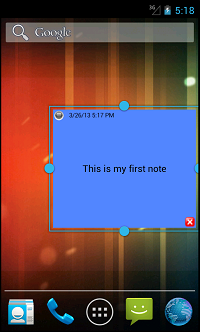
On every Android versions, the widget can also be moved if you press it for a few seconds and move it. If you move it really near the border of your phone's desktop, you can also have it placed on another virtual screen of your desktop (the widget will become transparent and will change of color before been able to do the jump to the next virtual screen).


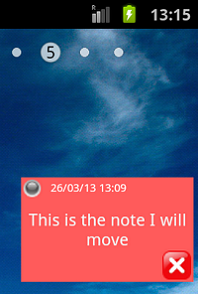
You can put as many notes on your desktop has you want, and combine the widgets sizes as needed to cope with your desktop configuration (its size and the "SMS to Desktop note" notes neightbours : icons and others widgets). The only limits are the widget size and the number of virtual home screens your phone has.
You can put a "SMS to Desktop note" to the trash bin if you need, but, as we briefly said it and will see it again, maybe it's not the best option to do.
1.3.2 Image buttons / touch events on a note
As you have already seen, different images, and informative texts, can appear on the note widget sides. The different images and informative texts will be shown and explained to you in this section, and the available touch events too. You will also see that some images size can be adjusted in settings.
The following display and its red numbers will serve as a reference :
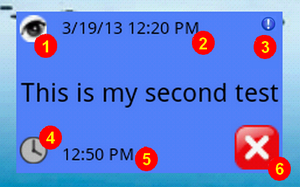
(1) The note pin
By default, the note pin is simply a decorative element for a note, but it can be configured in the app's settings. Indeed, 3 options are available, and you can choose the best suited setting for your needs :
- the pin can stay as it is, as a decorative element with no other function.
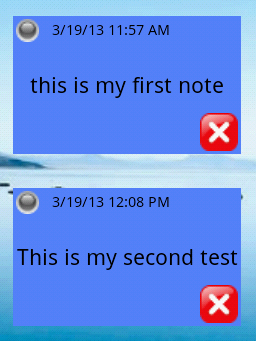
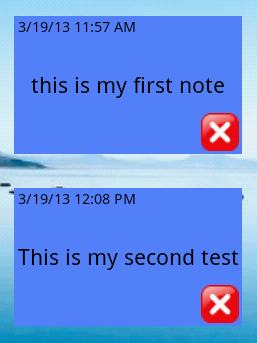
- the pin can be get rid of (let's say the note has in fact a sticky part behind to remain fixed on your desktop, so no need for a pin :-). You can use this option, for example, if you feel the pin as cumbersome, no matter what its size is (for example, if you want to have the maximum space for text display on the note) so get rid of it can be a relief.
- the pin can be transformed as "eye" pin, which can be pressed on. If pressed, the eye pin will give you the opportunity to see the text note content in fullscreen and in a one-touch operation, something that can be helpful if you have a compact phone screen.
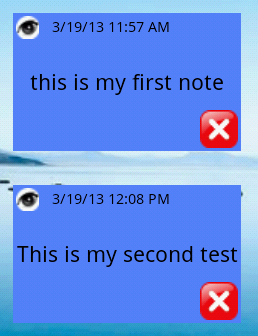
If you choose the last option, you will have maybe to adjust the pin image size too. Phones react indeed differently depending on their touch screen sensibility and, pressing the image, maybe you will feel difficult to activate the fullscreen option if the image size is too small (the input screen can even appear in place of the fullscreen screen because the input screen is the screen you obtain by default if you touch in any other place in the note widget - the delete button excepted -. By making the image bigger, you will be able to cope better with the touch screen sensibility.
Here is the note content in full screen when the eye pin has been pushed.
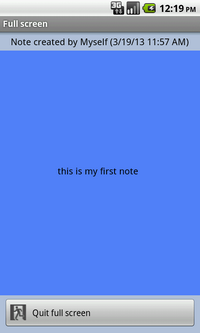
The fullscreen display gives you also the ability to press on the links you note text may contain : web url, phone number, etc… Your phone will react adequately then by launching a web browser window or the phone number dialing window for example. In the note text in fullscreen, links can be figured by their underline. The memo of the note, if present, can be displayed too, using the bottom radio button.
(2) The note general information
The text near the pin give 2 data about the note :
- the creator identity, i.e. the sender or writer of the note. This info is not shown by default if you're yourself the note creator on your phone (this can be changed in settings)
- the creation date and hour.
These two data can be made invisible in settings (then, you can still see the creator and the creation date in the upper part of the widget main screen)
(3) The exclamation mark
It will only appear if someone sent you a note and you cannot see it (apart from a notification in your phone notification section) because no empty note widgets are available. In this situation, drop a new widget on your phone home screen desktop and the note will appear. When no incoming notes remain to be shown, the exclamation mark will disappear on all the notes.
(4) The clock
This image is only present on a note widget when a reminder has been created on it, and disappears when the reminder cease to exists.
The clock can be made invisible in settings (then, you can still see if a reminder was put on a note by looking inside the reminder creation window)
(5) The reminder text
This text displays data about the reminder. If the reminder is in today's range, you will see only the hour the alarm will be launched. Date and hour for the alarm appear most of the time otherwise.
Some texts signs can also appear right after the date and hour of alarm :
- if the note has been put in auto-delete mode in the reminder creation screen, "(-)" can be seen.
- if the reminder is attached to a repetitive event (ex : every day) "(>)" can be seen.
The whole reminder text can be made invisible in settings (then, you can see if a reminder was put on a note by looking inside the reminder creation window)
(6) The delete button
This button is a shortcut to get rid of an unused note. By default, it is displayed on all notes with a content. A confirmation dialog box will appear. After the delete operation is completed, the widget will be left empty, ready to be reused. Two other alternatives exist to delete the note :
- use the "Delete" button in the widget main screen
- drop the widget in Android trash bin, although it is not an efficient operation most of the time, as the empty, reusable widget will disappear from your phone screen.
… and the button can be made invisible in settings.
If you choose to keep the delete button displayed on notes, you will have maybe to adjust its image size in the app settings too. Phones react indeed differently depending on their touch screen sensibility and you will maybe feel difficult to activate the delete option if the image size is too small (the input screen can even appear in place of the delete screen because the input screen is the screen you obtain by default if you touch in any other place in the note widget - the delete button excepted -. By making the image bigger, you will be able to cope better with the touch screen sensibility.
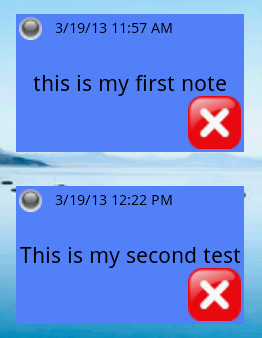
Please note that :
- you can also adjust in settings the use of the confirmation box, which can be skipped.
- if you disposed of a note by mistake, the note can be recovered in the "Notes history" window (more on this later)
1.3.3 More about text input and widow navigation
When you click in the Note text or Memo field, an input dialog box will appear for your convenience. All common text functions are available here (ex : select/copy/cut text options) and if voice input is available, you will find a recorder button on the virtual keyboard too. Recorder buttons shown directly in the widget main window have the same function.
About voice input : please note that "SMS to Desktop note" uses Google voice recognition system. This system needs your phone to have an internet connection available to work, because it offloads its processing to the Internet cloud. Everything you say to Android goes back to Google's data centers, where powerful servers apply statistical modeling to determine what you're saying. We suggest that you test and/or configure first the tool before using it.
Note that the field will automatically grow depending of your text size. It's your text size is very long, you may need to use the window scroller at the right of your phone screen to navigate. This kind of scroller can be found anywhere else in the app screens, as seen in the red area in the screen below.
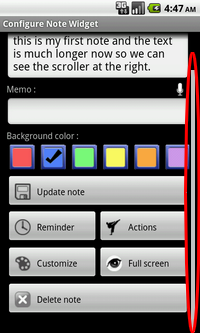
Please note that 3 following options related to text input can be configured in settings :
- the input dialog box opens automatically by default when you press a empty note. This behavior implies that your first option with an empty note is to fill it with text, but you can disable it. In this case, the widget main screen will appear, leaving you the choice of the first operation.
- by default, no transformation occurs on your text, but you can decide to have every first letter of every first word in a sentence of your note text capitalized.
- by default, every space or carriage return at each end of an input text will be truncated, but you can decide to have this operation disabled.
1.3.4 Text and note customization
Several background colors for notes are available in the widget main window. You can choose one using the color radio buttons at the center of the screen.
The "Customize" button will give you the control on the font size and the font color.
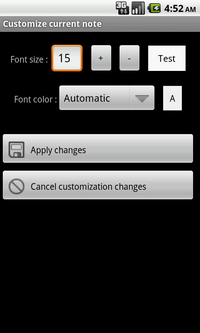
The value for the font size can be defined directly by giving a value to the numeric field at the left (the value is in "dip" -> density-independent pixels, an abstract unit that is based on the physical density of the screen) or using the "+" or "-" buttons. The default value coming with the app is 15 dip, but you can change it in settings for all the new notes to come. The "test" text at the right will give you a preview of display for the new size applied.
The value for the font color can be defined by selecting a value in the drop down box. The default value coming with the app is "Automatic", which means that that app will choose automatically a color suited to the current color background of the note (ex : if the background is Red, the automatic font color will be Write ; if the background is Yellow, the automatic font color will be Black). You can change the default value in settings for all the new notes to come. The color area at the right will give you a preview of the new color applied.
The new chosen values will apply to the current note only, and only if you press the "Apply" button.
Please note that if you modify only the customization on an already existing note, you will be directly send back to your device homescreen, skipping the note main screen. This behaviour has been designed to make your use of notes quicker, but you can change it in the Settings screen (look into the "Text input preferences for notes" section).
1.3.5 Receiving a "SMS for Desktop note"… and send one
If you have read the quick tutorial part, you already know how you can test a "SMS for Desktop note" reception so you can skip the next paragraph below.
To test the reception of a note, first make sure that you have put an empty "SMS for Desktop note" widget on your desktop. Then, type a SMS on your phone to send it to yourself (i.e. to your own phone number) as a test. Add this character sequence somewhere in the message before sending it :
@dn@

You will receive shortly your common SMS signal, and, by default, your test will appear as a blinking note that fills the widget.
The @dn@ code is essential to differentiate common SMSes, which will continue to follow their own usual way on your phone reception box, than a "SMS for Desktop note" which will be displayed on your phone desktop. Anyway, several others codes are available and can be put in a SMS to define a "SMS for Desktop note". Here is a full overview of the codes that people can use to send you notes :
| Group |
Code |
Meaning |
|
@dn@ or alternate code key : @#@ by default (1) |
It's a "SMS for Desktop note" and not a common SMS |
| Note background color |
@r@ |
Red background |
| Note background color |
@b@ |
Blue background (2) |
| Note background color |
@g@ |
Green background |
| Note background color |
@y@ |
Yellow background |
| Note background color |
@o@ |
Orange background |
| Note background color |
@w@ |
Violet background |
| Reminder type |
@oal@ |
Fire once |
| Reminder type |
@aal@ |
Fire once and autodelete note (3) |
| Reminder type |
@fal@ |
Fire every 5 minutes |
| Reminder type |
@fal@ |
Fire every 15 minutes |
| Reminder type |
@tal@ |
Fire every 30 minutes |
| Reminder type |
@hal@ |
Fire every hour |
| Reminder type |
@dal@ |
Fire every day |
| Reminder type |
@wdal@ |
Fire every working day |
| Reminder type |
@wal@ |
Fire every week |
| Reminder type |
@mal@ |
Fire every month |
| Reminder type |
@yal@ |
Fire every year |
|
@d@your_reminder_date@d@
Date patterns recognized :
dd-MM-yy
dd-MM-yyyy
dd/MM/yy
dd/MM/yyyy
MMM dd, yyyy
MMM dd yyyy
yyyy-MM-dd
|
Reminder date |
|
@h@your_reminder_hour@h@
Hour pattern recognized :
HH:mm
|
Reminder hour |
| Font color |
@fa@ |
Automatic |
| Font color |
@fr@ |
Red |
| Font color |
@fr@ |
Red |
| Font color |
@fb@ |
Blue |
| Font color |
@fg@ |
Green |
| Font color |
@fy@ |
Yellow |
| Font color |
@fo@ |
Orange |
| Font color |
@fv@ |
Violet |
| Font color |
@fw@ |
White |
| Font color |
@fk@ |
Black |
| Font size |
@fs@your_font_size@fs@ |
Font size in dip (density-independent pixels) |
- (1) Please look into the settings to define your own custom code to replace @#@. You can also specify in the option above if you want to use both codes or only your custom code : setting your own custom code and disabling @dn@ will ensure you a full privacy if needed.
- (2) The predefined default value (blue) is applied when nothing about the background color is defined in the SMS. Please see the settings to define your own default value.
- (3) The note will only appear on the desktop when the alarm fires, then it will disappear (notification, if enabled, will leave a trace anyway)
The above codes can be placed anywhere in the message.
Please note that if your contacts can define the notes content with the codes above, they cannot define the way the message will appear on your phone. When a contact send you a "SMS for Desktop note", your phone will try to find an empty widget to display the message. In this note reception situation, you have to know that :
- the app always try first to fill the biggest empty notes available : a empty 2 x 2 widget will always be filled before a smaller one, like an empty 2 x 1 widget
- Android put many restrictions on the home screens of phones. For example, the home page screen can't change automatically (an app cannot decide to act on its own on the home page screens).
...so it's a good starting practice to always leave several (one, two or more, depending of your use) empty widgets on your phone main home page (2 x 1, for example) for your own quick note use, and at least a few others ones (and why not bigger ones, 2 X 2, for example ?) where you would want to see the notes people send to you.
If someone sent you a note and you cannot see it (apart in your phone notification section) because no empty note widgets are available, an exclamation mark will appear on all notes. In this situation, drop a new widget on the desktop and the incoming note will appear. When no incoming notes remain to be show, the exclamation mark will disappear on all the notes. You can use this feature if you want to put a little more control on the incoming notes and decide, this way, where you want to put them. An opposite strategy would be to put many empty widgets on several home page screens, and take care of the notifications to determine what to do.
Please note that you stay completely in control of the way your phone react when a "SMS for Desktop note" arrives : in the app settings, you can define if your phone will ring, vibrate, read the message aloud using speech synthesis (this option is disabled by default, as it can interfere with your privacy, making people around you to know about your notes content), control the blinking effect, duration, or the way notification will work (i.e. : all the time ; only when a note cannot be displayed ; let the original SMS to be seen ; or… do nothing)
You can take advantage of your own notes if you are in contact with another person who possesses the "SMS for Desktop note" app. In this case, no need for you to use the codes above when you want to send him one of your notes. Press the note to send, use the "Actions" button, choose the "Share your note by SMS" option, choose your contact and activate the "Add codes to create a SmsToDesktopNote" toggle button before sending the SMS with the "Ok" button. We will see this subject deeper in the part dedicated to the "Actions" button in the 1.3.8 section below.
1.3.6 Fullscreen screen
The fullscreen screen displays your text in full view. It gives you also the ability to press on the links you note text may contain : web url, phone number, etc… Your phone will react adequately then by launching a web browser window or the phone number dialing window for example. In the note text, links can be figured by their underline.

A scroller at the right can be used if the text size is still too big, and the "Quit" button at the button allows you to exit the full display.
1.3.7 Reminders
The reminder screen can help you defines on one note an alarm of a different type. It is divided in 2 sections :
- an upper section with 4 "quick alarm" buttons which put directly an alarm on the note to fires in 15 minutes, 30 minutes, 1 hour or 3 hours (please note that custom delays can be defined in settings).
- an lower section with buttons to define a custom alarm : day, hour and type of firing event.
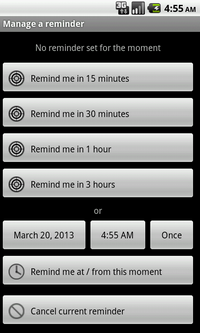
The current types of firing events are available :
- fire only one time,
- fire only one time, and delete the note right after the alarm fires and ends. This kind of firing can be useful if you plan not to keep the note content after the alarm. "(-)" will then be seen at the end of the alarm text on the widget.
- fire every 5 minutes (repetitive event).
- fire every 15 minutes (repetitive event).
- fire every 30 minutes (repetitive event).
- fire every hour (repetitive event).
- fire every day (repetitive event).
- fire every working day (repetitive event).
- fire every week (repetitive event).
- fire every month (repetitive event).
- fire every year (repetitive event).
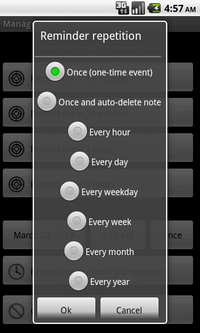
"(>)" will be seen at the end of the alarm text on the widget if it a repetitive event. In case of a repetitive event, the widget will always show the next occurrence of the alarm.
The custom values for the reminder will apply to the current note only, and only if you press the "Remind me at / from this moment" button.
The "Cancel current reminder" button will delete a reminder previously set on the note.
Please note that if you modify only the reminder on an already existing note, you will be directly send back to your device homescreen, skipping the note main screen. This behaviour has been designed to make your use of notes quicker, but you can change it in the Settings screen (look into the "Text input preferences for notes" section).
When you come back to a reminder, you will also see a new button : it allows you to shift in time a reminder, retaining its others characterics (recurrence, automatic delete).
Another option in the Setting screen is also available : it enables all notes to have their background change to a different color when the reminder fires. For example, you can define that your notes backgrounds will change to the red color when their reminders fires. By default, of course, this option is not activated.
At last, remember that if the reminder is in today's range, you will see only the hour the alarm will be launched. Date and hour for the alarm appear most of the time otherwise, and you can configure in the settings the current display (for the reminder clock and the reminder text).
1.3.8 Actions
The "Actions" screen gathers various functionalities that enlarge the possibilities offered by the "SMS for Desktop note" notes.
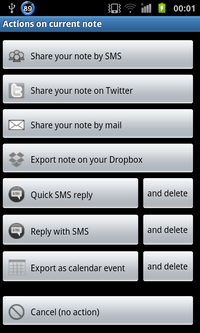
- "Share your note by SMS" : you can send the note content to one or several contacts from your phone contact list, by selecting them in the screen, and/or typing "on the fly" the phone numbers in the dedicated input field seen on the upper part of the screen (if two or more phone numbers are to be used in the field, separate them using a semicolon -> ";").
Please note that the contacts appearing in the list are only contacts containing a mobile phone number.
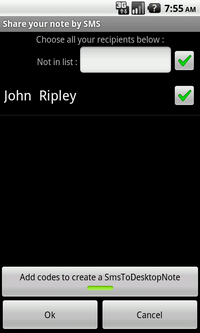
By default, by "note content", we mean the text content, but you will notice a toggle button below in the contact choice screen that can be lighted up if you press it : if pressed, the SMS sent will contain all the note codes, ie your contact will receive a copy of your note with all its features (text, background color, font color, font size, reminder and reminder options) if he has the "SMS for Desktop note" app installed on his phone too. If the app is not installed on his phone, he will receive simply a SMS with the text surrounded with codes, so it's better to light up the option only if you know your contact has the app.
Overall, this functionality can be used in many ways as your notes can become the source for new SMS texts, to send to many contacts at each time.
- "Share your note on Twitter" : if you have a Twitter account, your notes can become a tweet source. No need to have a Twitter app, this app will help you to connect directly to your account to post the tweet.
To help you cope with the 140 characters limit, you will notice in the text input dialog box a small indicator at the right which gives you the length of your note content as you type text (red circle in the screen below).
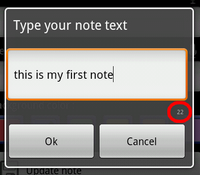
When you push the button, the app will initiate a dialog with the Twitter web service. You will have to provide your Twitter ID and password to connect (it's better to authorize it to be save as it will stored it for a latter use) and the app will automatically post your tweet before closing down the connection.
- "Share your note by mail" : if you have a mail client configured on your phone, you can use this functionality to send the note by mail.
If the mail client is properly configured, you will see a mail window when you push the button. The mail will contain by default the note text content. You can modify the text before insert your contact mail address.
Please note that the sender address (your mail address) can be defined in "SMS for Desktop note" settings.
- "Export note on your Dropbox" : if you have a Dropbox account, you can use this functionality to send the note content, saved as a text file on your Dropbox.
If you push the button, your note will be saved first as a text file, before an authentication try is made on Dropbox. You will have to confirm the action and give your account credentials, which will be kept for a future upload.
Please note that, for a smoother experience using this function, we advise you to also install the Dropbox Android client app on your device, if you haven't done it already. Without it, Dropbox relies instead on a web page for authentication and, due to an imperfect design by their dev team on this web page, the browser window stays opened after authentication, so you would have to manually close it with your "back" button each time...
- "Launch a search on Google" : you can use this functionality to launch a browser search on your text note's content, using Google. Your prefered search mode will launched then in a new browser window. Quit the browser when you have finished to come back to the note.
- "Copy text to clipboard" : you can use this functionality to store the text note's content into the clipboard. It's a one touch operation, easier to do than doing the usual long push/select all/copy operation on the text content, if you have to duplicate a note, for example.
- "Quick SMS reply" : this functionality can help you to reply to a note received from one of your contact in a very fast way. For example, let's say somebody asks you to do something on a note you receive, you can respond quickly with a pre-recorded message.
First, you have to prepare the pre-recorded message in "SMS for Desktop note" settings. Then, when you will push the button, the pre-recorded message will be sent as a simple SMS to your contact.
Please note that another related option in "SMS for Desktop note" settings is available : if you choose it, you can have your contact original message repeated at the end of the SMS to help him understand about what subject you're talking about (this can be useful if several notes are sent in a small time range from the same contact, and you want to quickly reply to him for each notes)
Finally, you will see an "And erase" button near the "Quick SMS reply" button. This button can help you to automatically dispose of the original note AFTER the quick SMS response has been sent (if your contact original note has now no need to stay on your phone home screen)
- "Reply with SMS" : this functionality allows you to reply to a note received from one of your contact by inserting the response message in a input text dialog box.
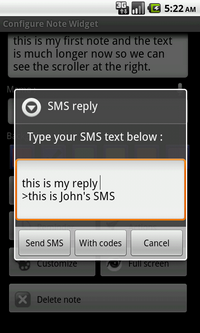
When you will push the "Send" button, the pre-recorded message will be sent as a simple SMS to your contact.
When you will push the "With codes" button, the pre-recorded message will be sent as a "SMS for Desktop note" to your contact.
Please note that if you choose it through the option in "SMS for Desktop note" settings, you can have your contact original message repeated at the end of the SMS to help him understand about what subject you're talking about (this can be useful if several notes are sent in a small time range from the same contact)
Finally, you will see an "And erase" button near the "Reply with SMS" button. This button can help you to automatically dispose of the original note AFTER the SMS response has been sent (if your contact original note has now no need to stay on your phone home screen).
- "Export as calendar event" : this functionality allows you to transform a note in one of your phone calendar event. This can be useful if you decide that a note has no need to stay visible on your desktop for a period of time, and it would be better to have it now only as a calendar event.
When you will push the button, the functionality tries to contact your phone calendar app (if they're several found, you will be asked to choose one) and insert the event directly.
Important : the event will be scheduled for a specific date only if you previously put first a reminder on the note : the reminder date and hour data will be used the date and hour for the calendar event.
If your calendar app is not compatible with the direct insert operation, "SMS for Desktop note", in an alternate operation, will give you a hand, if possible, to create the event manually, copying the note text at least.
Finally, you will see an "And erase" button near the "Export as calendar event" button. This button can help you to automatically dispose of the original note AFTER the calendar event has been created (if your contact original note has now no need to stay on your phone home screen).
1.3.9 Settings
All "SMS for Desktop note" settings are available either if you press your phone "Menu" key when you're in the app main screen (the widget main window, which appears when you press one the "SMS for Desktop note" widget) or using the traditional Android three bar button at the upper left of the same screen.

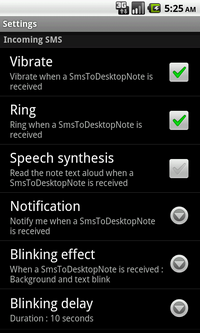
The settings are organized in the following groups :
- "Incoming SMS" : all the settings about receiving note from others contacts. You can adjust the way the incoming SMS are managed with this group of settings.
- "Reminder" : all the settings about the reminders and their actions. You can adjust the way the alarms are rendered on your phone with this group of settings.
- "Notes display" : all the settings about the appearance of the notes widgets. You can define with this group of settings the way the notes widgets looks (and behave).
- "Text input preferences for notes" : all the settings about the text input for the notes widgets, and related actions.
- "Mail for export operations" : here you can give the app your mail address, to be use in the operations about mail in the app (and especially the export operations)
- "SMS reply to a note" : all the settings about the actions button (in the "Actions" window) dedicated to SMS reply to incoming notes.
- "Miscellaneous" : all miscellaneous functions. Here, you can find a button to call a screen where the password for the Note history can be changed. To disable the use of a password there (if you activate it previously), simply enter nothing as a new password.
- "Troubleshooting" : all available functions for troubleshooting.
In the "About" section of settings, you can also reach our website pressing the app label.
1.3.10 Note history
The "Note history" window of "SMS for Desktop note" will appear if you press first your phone "Menu" key when you're in the app main screen (the widget main window, which appears when you press on one the "SMS for Desktop note" widget on your phone home screen) or using the traditional Android three bar button at the upper left of the same screen.
"Note history" is a back office section of the app that provides useful features. If you press the icon in the Menu, you will see the screen at the right, below :

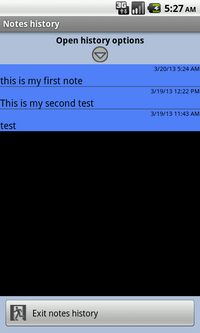
All the notes content that you created until now is displayed here, even the deleted notes. All notes data are kept and shown here (text, creator, display), with the only exception of the reminders data. You can scroll through the list.
By default, notes are sorted by ascending order of date creation, but you can change the sort order opening the "Options" panel in the upper part of the screen if needed. Others options are the type filter (active note, deleted notes or both) and the text search filter.
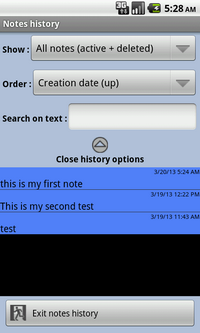
Several options are available on a long clic on a note line :
- you can duplicate the note (for a active note). An empty note widget on your home screen desktop is needed for this operation to succeed.
- you can restore the note (for a deleted note) . An empty note widget on your home screen desktop is needed for this operation to succeed.
- you can delete definitely the note (for a deleted note). It will disappear definitely from the note history.

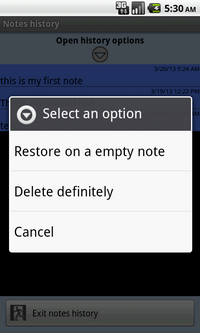
The most used function here is definitely the last one : use the history to restore a note deleted by mistake, but you can see the others possibilities offered here. Duplicate the note, for example, can be used to transfer the note content to a bigger widget if your phone is on Android 2.x.
Several others general actions are available here if you press your phone "Menu" key :
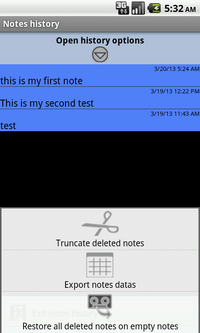
- you can erase all the deleted notes from the history using the "Truncate" function
- you can export the current note history as a csv/xls file on the SD card, or send it by mail, or upload it on your Dropbox (an authentication will be made in this case, and your credentials will be needed the first time).
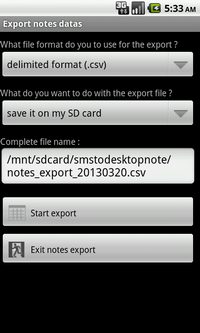
- you can restore all deleted notes on empty notes. Enough empty note widgets on your home screen desktop are needed, or all the notes will not be restored (and a message will tell you about it).
Please note that the access of the history window can be protected with a password to prevent somebody to read your note history on your phone. By default, no password is activated. To activate it, go to the "Miscellaneous" section of the app settings : you will find a button where you will be able to specify a password or reset it (or even disable the use of a password by validating no new password in the screen). When activated, the password will be asked each time you will want to access this screen.
1.4 Troubleshooting
1.4.1 General troubleshooting
Please look first into the FAQ
here and if no solution can be found in it, report us the problem with the app using the contact form
here.
If a problem happens with only one widget, you can put it on the Android trash bin and try to restore the note content using the "Notes history" screen.
You can also enable the technical log (see the option at the end of settings). This log can give data about the behaviour of the app when the problem rises. You can send us its content to analyse it.
In the worst case scenario, if your phone encounters problems that have an impact on your "SMS for Desktop note" database, you can try to use the "Erase" option in settings to empty the database. This will erase all the notes (even the history), but will keep all your app settings. Prior to this operation, you can use the "export" feature of the "Note history" window to keep a trace of your notes content.
1.4.2 License troubleshooting
Your phone needs to have an internet connection to check periodically for the "SMS for Desktop note" license. If you encounter a message relative to license expiration and everything should be right because you obtained the app through Google Play, the problem could come from only the lack of an active internet connection or the lack of use of the app when you were connected the last time, so try to connect first to the internet using your connection or at least a Wifi connection, and press then one note widget : the license message should disappear when you enter in the app main screen.
If another licensing problem occurs with the app, please report us this problem using the contact form
here.
1.4.3 End of validity date (trial version only)
The trial version of "SMS for Desktop note" has a validity limited in time (a specific date for all users) that will ensures you the best experience with the trial version support. The current validity date is indicated in the app place on Google Play, but if the validity date is going to expires in a few days, a small message in the app main screen will tell you about it. If the validity date is expired, you will receive a message in the app main screen and you cannot use the app again without upgrading it first.
Upgrading the trial version is a simple operation as you need only to download an upgrade using the common app upgrade window on your phone. It's a free operation.
